Sawyer’s pipeline rim clamp: a quick‑start guide
Sawyer Manufacturing Company’s pipeline rim clamps provide an easy solution for tough pipe reforming jobs. Watch Sawyer’s step-by-step instructions on how to use the clamp for maximum accuracy and minimal downtime.
Suitable for pipe sizes from 4 inches to 72 inches, Sawyer’s manual lineup Rim Clamp is designed for use on out-of-round pipes that require a high level of alignment accuracy. The Rim Clamp can reform 45,000 PSI tensile strength pipe up to Schedule 80, with out-of-round conditions of up to 2 inches (51 mm) depending on wall thickness. For larger jobs, Sawyer’s heftier Ultra Rim Clamp can provide the same benefits.
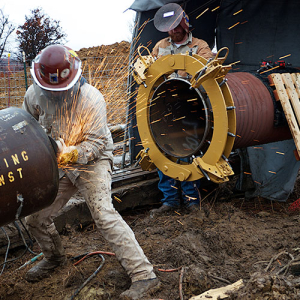
The Rim Clamp being used in the field. Image courtesy of Sawyer Manufacturing Company.
Why choose the Sawyer Rim Clamp?
Sawyer Manufacturing Company has been designing and manufacturing pipeline and welding equipment in the USA since 1948, and has a long-standing 20+ year partnership with Tremco Pipeline Equipment to supply its equipment to the Oceania region.
Sawyer’s rim clamps:
- High reforming capacity: handles up to X45 Schedule 80 pipe with tensile strength up to 45,000 PSI and up to 2″ out‑of‑round conditions, depending on wall thickness
- Rigid shell design: offers a robust external alignment solution, preferred by users who need consistent accuracy and reliability over flexible chain clamps
- Efficient setup: The jackscrew setting gauge speeds setup and ensures repeatable precision.
- Safe and stable: heavy‑duty galvanised construction, pivoting pads on jackscrews, and a secure latch mechanism provide stability and safety in field conditions
- Thoughtful tools: each rim clamp also comes with a set of tools for operation, including a torque wrench, speed handle, and socket for reliable pressure control and efficient operation.

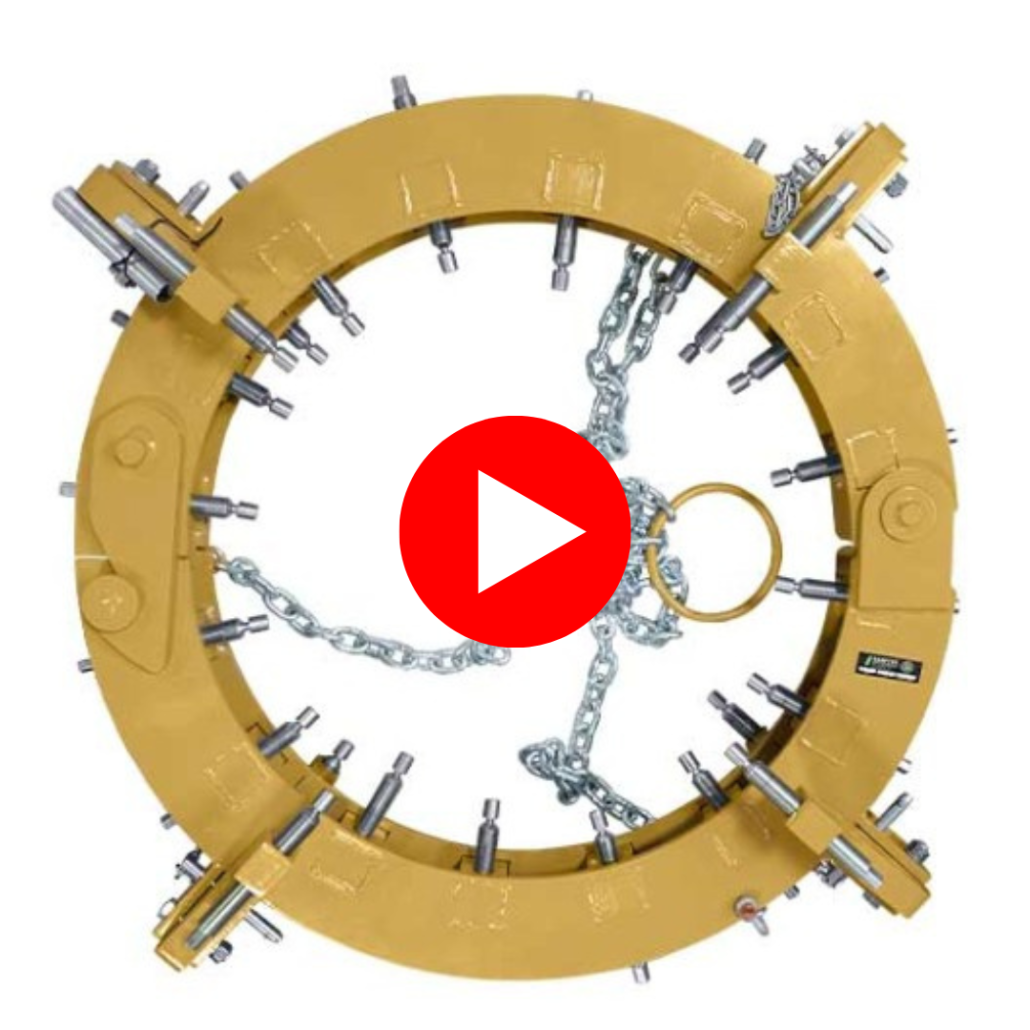
The Rim Clamp. Image courtesy of Sawyer Manufacturing Company.
How do pipeline rim clamps work?
The rim clamps feature multiple heavy duty, galvanised jackscrews, which give the user the ability to apply precise reforming pressure on specific areas of pipe. The specialised torque wrench supplied with the clamp furthers this capability by allowing the user to set the exact torque required for the reforming application, saving time and effort by setting the perimeter of the jackscrews before the external line up clamp is placed on the pipe. The unique jackscrews on Ultra RIM Clamps have trapezoidal thread, which makes them stronger than conventional jackscrews and able to assert more reforming pressure on the pipe.
Hinged flip-up jackbars allow for simple pipe mating, and also ensure the clamp can be used for applications requiring 100 per cent welding and/or grinding without removing the pipe clamp. Each jackbar comes with a pivot pad, allowing this pipeline welding clamp to be used on coated or uneven pipe surfaces.
A step by step guide to using the Sawyer Rim Clamp
Watch this short video for a quick explanation of how to use Sawyer’s Rim Clamp.
The setup process for the Rim Clamp is engineered to save time and protect equipment:
- Unlock and position the clamp: Release the clamp’s locking mechanism by pulling on its chain-operated hook. Once open, lift the clamp onto the pipe. Smaller 4-12 inch units can be placed manually, while larger sizes require mechanical lifting using the clamp’s built-in lifting chain.
- Center and preset the jackscrews: Before placing the clamp around the pipe, loosen all reforming jackscrews except for the top two. Use the jackscrew setting gauge (provided) to preset these top screws to the approximate pipe radius. This prevents thread damage during installation and ensures the clamp sits true from the start.
- Securing the Clamp: Lower the clamp onto the pipe so that the adjustable jackbars extend approximately 2 inches beyond the pipe ends. As the clamp closes, the locking hook should auto‑latch. If it doesn’t, push the two sides inward until latched securely.
- Align and level the pipe: Use the reforming jackscrews to center the clamp within ±1 inch. Then adjust the stable jackbars until the clamp is perfectly perpendicular to the pipe axis. Slight tweaks to the reforming screws may be required during this step.
- Fitting a secondary pipe or fitting: To align a secondary pipe or fitting, remove the latch pins on the top adjustable jackbars and swing them upward and clear of the joint. This allows full access for alignment and welding prep before reforming pressure is applied.
- Reforming the pipe: Once the two are roughly aligned, begin tightening only the reforming jackscrews over the pipe’s high‑spot and directly opposite (180° apart), working in sequences of three jackscrews. Don’t use all the jackscrews. Avoid overtightening—only apply enough pressure to reform the pipe incrementally. A back-and-forth tightening process (tightening and relaxing) may be needed to bring the pipe back to true round without overstressing the material.
- Release the jackscrews: Once the pipe has been reformed, loosen the jackscrews over the high spot, working in a sequence of three jackscrews. It will be necessary to reduce the pressure of some jackscrews as you tighten others. It may be necessary to repeat this procedure several times.
Take on the toughest pipeline reforming jobs
From placement to reforming, the Sawyer Rim Clamp provides a systematic way to correct ovality and achieve precise line‑up for pipeline welding. Its durable frame, calibrated jackscrews, and thoughtfully designed tools—like the setting gauge and torque wrench—make it a trusted choice for jobs where accuracy is critical.
Not sure the Rim Clamp is the right pipe clamp for you?
Sawyer Manufacturing’s line of pipe-to-pipe fit-up equipment provides a good range of durable, simple, easy-to-use and accurate pipe clamps to meet different needs. Find the right pipe clamp for your specific needs here.
To learn more about Sawyer’s rim clamps and other products, contact the Tremco Pipeline Equipment team at sales@tremcopipeline.com.au or call 07 3344 1066.


Leave a Reply
Want to join the discussion?Feel free to contribute!